Administration of the project
Vickers Hardness Calculation, Hardness Test and Formula
Vickers Hardness Calculator
Hardness is a measure of the resistance of a material to plastic deformation induced by applied forces. Some materials (e.g. metals, ceramics) are harder than others (e.g. plastics, wood). Hardness is an important parameter correlating with wear resistance of the material. In applications where the wear has to be restricted, high hardness materials are typically used. See the description of the Vickers hardness test below.
Vickers hardness test
The Vickers Hardness test (ISO 6507) is used to characterize hardness of various solid materials (metals, ceramics, etc.). A diamond pyramid is pressed against the solid with a certain normal load and the hardness is calculated based on the imprint left on the surface. Hardness may vary as a function of load, therefore, it is advised to specify applied when HV hardness is reported. A square-based pyramid indenter whose opposite sides meet at the apex at an angle of 136° is employed in Vickers hardness test. Imprint size is measured with the aid of optical microscope, see the figure below.
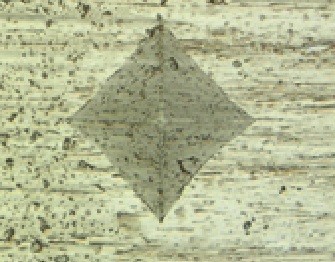
In contrast with Rockwell and Brinnell hardness techniques, the pyramid indenter is advantageous since the square imprints are easier to measure than the round impressions from spherical and conical indenters. Another advantage of the Vickers hardness test is absence of different scales, as compared to Rockwell and Brinnell tests. At low values (VH<~400HV), Vickers hardness was shown to be the same as Brinell hardness (see hardness conversion section).
Schematic representation of the Vickers test is shown in Figure 1. Further information regarding existing standards and procedures can be found in references [1,2].
Vickers hardness formula
The Vickers hardness (HV) is calculated using the following Vickers hardness formula:
![]() .
.
where d is the average of the two diagonals of the imprint and F is the applied load. Hardness in GPa is calculated as follows:
![]() .
.
The yield stress can be approximated from the hardness (given in HV) as follows:
![]() .
.
A video of a hardness test procedure is shown below:
https://www.youtube.com/watch?v=OhmRlZUdmww
Hardness conversion
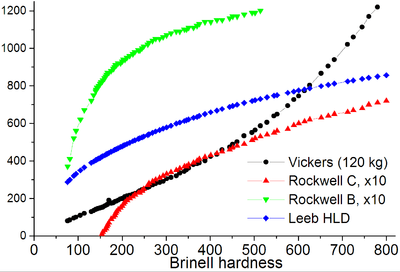
Different hardness scales are used for specific reasons. For non-homogeneous materials like cast iron, Brinell hardness may be used. For hard materials like steel, Rockwell hardness can be used. Comparison of the hardness values obtained using different hardness scales is shown in the graph below (source):
Here is a simple conversion tool (read the comments below the calculator for limitations):
Following limitations apply:
1) Standard Hardness Conversion for metals acc. ASTM E 140 – 97, September 1999, Conversion for Non-Austenitic Steels, Table 1. The accuracy of the conversion depends on the accuracy of the provided data and the resulting curve-fits.
2) Indentation hardness is not a single fundamental property but a combination of properties, and varies with the type of test. The modulus of elasticity and the depth of indentation influence conversions. Therefore separate conversion tables are neccessary for different materials.
3) Brinell Hardness numbers in parentheses are outsite the range (HB>630) This limit is set to avoid errors introduced by the deformation of the ball indenter itself.
Exact conversion of the hardness values obtained using various hardness scales in general is not possible. However, by comparison of the hardness values at different scales, one can convert one hardness measure to another. For example, from the graph above one can convert Vickers hardness to any other hardness scale. A table with the hardness values is given below:
| Brinell HB | Vickers HV | Rockwell C HRC | Rockwell B HRB | Leeb HLD [1] |
|---|---|---|---|---|
| (10 mm Ball, 3000 kg load) | (1 kg) | (120 degree cone 150 kg) | (1/16" ball 100 kg) | |
| 800 | - | 72 | - | 856 |
| 780 | 1220 | 71 | - | 850 |
| 760 | 1210 | 70 | - | 843 |
| 745 | 1114 | 68 | - | 837 |
| 725 | 1060 | 67 | - | 829 |
| 712 | 1021 | 66 | - | 824 |
| 682 | 940 | 65 | - | 812 |
| 668 | 905 | 64 | - | 806 |
| 652 | 867 | 63 | - | 799 |
| 626 | 803 | 62 | - | 787 |
| 614 | 775 | 61 | - | 782 |
| 601 | 746 | 60 | - | 776 |
| 590 | 727 | 59 | - | 770 |
| 576 | 694 | 57 | - | 763 |
| 552 | 649 | 56 | - | 751 |
| 545 | 639 | 55 | - | 748 |
| 529 | 606 | 54 | - | 739 |
| 514 | 587 | 53 | 120 | 731 |
| 502 | 565 | 52 | 119 | 724 |
| 495 | 551 | 51 | 119 | 719 |
| 477 | 534 | 49 | 118 | 709 |
| 461 | 502 | 48 | 117 | 699 |
| 451 | 489 | 47 | 117 | 693 |
| 444 | 474 | 46 | 116 | 688 |
| 427 | 460 | 45 | 115 | 677 |
| 415 | 435 | 44 | 115 | 669 |
| 401 | 423 | 43 | 114 | 660 |
| 388 | 401 | 42 | 114 | 650 |
| 375 | 390 | 41 | 113 | 640 |
| 370 | 385 | 40 | 112 | 635 |
| 362 | 380 | 39 | 111 | 630 |
| 351 | 361 | 38 | 111 | 622 |
| 346 | 352 | 37 | 110 | 617 |
| 341 | 344 | 37 | 110 | 613 |
| 331 | 335 | 36 | 109 | 605 |
| 323 | 320 | 35 | 109 | 599 |
| 311 | 312 | 34 | 108 | 588 |
| 301 | 305 | 33 | 107 | 579 |
| 293 | 291 | 32 | 106 | 572 |
| 285 | 285 | 31 | 105 | 565 |
| 276 | 278 | 30 | 105 | 557 |
| 269 | 272 | 29 | 104 | 550 |
| 261 | 261 | 28 | 103 | 542 |
| 258 | 258 | 27 | 102 | 539 |
| 249 | 250 | 25 | 101 | 530 |
| 245 | 246 | 24 | 100 | 526 |
| 240 | 240 | 23 | 99 | 521 |
| 237 | 235 | 23 | 99 | 518 |
| 229 | 226 | 22 | 98 | 510 |
| 224 | 221 | 21 | 97 | 505 |
| 217 | 217 | 20 | 96 | 497 |
| 211 | 213 | 19 | 95 | 491 |
| 206 | 209 | 18 | 94 | 485 |
| 203 | 201 | 17 | 94 | 482 |
| 200 | 199 | 16 | 93 | 478 |
| 196 | 197 | 15 | 92 | 474 |
| 191 | 190 | 14 | 92 | 468 |
| 187 | 186 | 13 | 91 | 463 |
| 185 | 184 | 12 | 91 | 461 |
| 183 | 183 | 11 | 90 | 459 |
| 180 | 177 | 10 | 89 | 455 |
| 175 | 174 | 9 | 88 | 449 |
| 170 | 171 | 7 | 87 | 443 |
| 167 | 168 | 6 | 87 | 439 |
| 165 | 165 | 5 | 86 | 437 |
| 163 | 162 | 4 | 85 | 434 |
| 160 | 159 | 3 | 84 | 430 |
| 156 | 154 | 2 | 83 | 425 |
| 154 | 152 | 1 | 82 | 423 |
| 152 | 150 | - | 82 | 420 |
| 150 | 149 | - | 81 | 417 |
| 147 | 147 | - | 80 | 413 |
| 145 | 146 | - | 79 | 411 |
| 143 | 144 | - | 79 | 408 |
| 141 | 142 | - | 78 | 405 |
| 140 | 141 | - | 77 | 404 |
| 135 | 135 | - | 75 | 397 |
| 130 | 130 | - | 72 | 390 |
| 114 | 120 | - | 67 | 365 |
| 105 | 110 | - | 62 | 350 |
| 95 | 100 | - | 56 | 331 |
| 90 | 95 | - | 52 | 321 |
| 81 | 85 | - | 41 | 300 |
| 76 | 80 | - | 37 | 287 |
References
[1] https://en.wikipedia.org/wiki/Vickers_hardness_test
[2] http://www.struers.com/en-GB/Knowledge/Hardness-testing/Vickers#


